Recently, I took and passed the CPENT certification exam. I wanted to take some time to share my experience of the exam and some helpful tips that can help you if you take this exam.
First off, I want to note that the CPENT was offered to me. I actually was not aware of this certification and had always had my sights set on the OSCP as it’s been more of a popular certification for hands-on penetration testing. After being told about this certification, I quickly took to the internet to learn as much as I can about it and what it would compare to. To my surprise, many folks on Reddit compared it to the OSCP. However, there are some very different things that the CPENT does.
For the exam, you will have multiple areas that you will need to have knowledge in. Active Directory, CTF, IOT, Binaries, OT, Pivoting and Double Pivoting. The new areas that CPENT focuses on is IOT and OT. These areas were also really new to me as I had not really touched IOT or OT devices and had not seen them in any real CTF challenges so far.
Preparation
Once you are set up for the CPENT, you’ll have the option to start your exam dashboard. However, know that when you do this, you’ll only have 30 days to take the exam and submit your written pentest report. So, you’ll want to do this when you’re ready to take the exam, after doing the labs and other preparation steps below.
To prepare, you’ll want to focus on knowing fundamentals of scanning, enumeration, exploitation, privilege escalation, and pivoting. You WILL use these throughout the exam. Find OSCP-like challenges on TryHackMe, HackTheBox, or even VulnHub. Look for CTF challenges that require you to elevate privileges, crack passwords, or pivot to other machines. I cannot stress how useful pivoting will be to you. You can pivot with Metasploit, proxychains, or any other method that you like. Proxychains is my go-to for pivoting.
Understand how to use tools such as nmap, nikto, burp, hydra, john, metasploit, netcat, wireshark, and more than I could list right now. All of these tools will be in your arsenal, so having a great understanding of how they work and hands-on experience using them will be extremely beneficial to you. The less time you have to spend googling how to run specific scans or how to crack SMB/SSH/FTP passwords with hydra, the better for you.
Aside from the tools and techniques, one of the VERY BEST ways to prepare yourself is to keep great notes. This is the number one thing that I would recommend you to do. Sure, it’s great to get some hands on with hydra. However, if you have amazing notes on various scenarios using hydra, you can quickly jump to the notes when you need it.

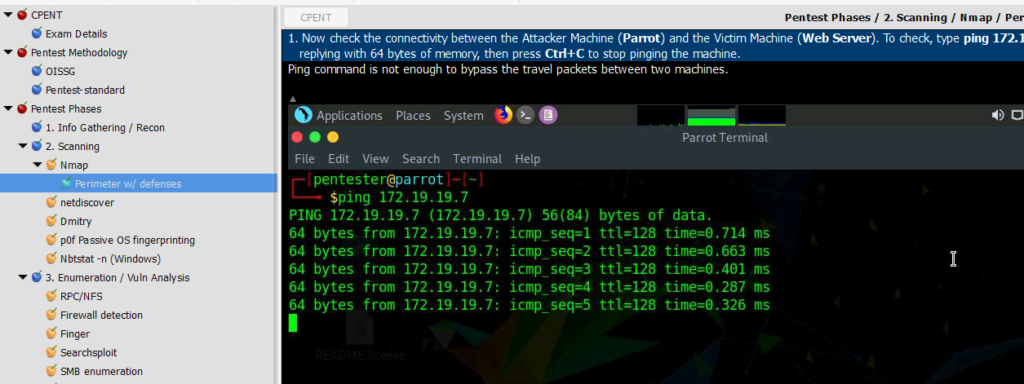
Above, is a screenshot from my CPENT notes in the program Cherry Tree. This amazing note application uses hierarchical notation and is a great tool to keep your notes for the CPENT, or future penetration testing. As you can see, I’ve got the phases of the penetration test along with different tools, technologies, and methodologies within sub-categories. As an example within the Scanning category there is a sub-category of Nmap, and within that sub-category I have a section for Perimeter scanning with defenses. That note lists out different ways to bypass defenses with scanning options that you could try. As a side note, this is a previous version of my CPENT notes as I had migrated them to my Kali VM during further study.
Using this type of a notation program, you’re able to really have in-depth and categorized notes that really helps you later on in your exam. As the CPENT is open book, you can use your notes and even the internet to search for things. So, thorough notes will be extremely beneficial to you during your exam. One other way you can boost your notes is to take plenty of notes from the CPENT Labs and from the CPENT Practice Range. Please note that BOTH the labs and the practice range are limited time items. You can purchase an extension, but I would highly encourage you to do both within time. The Labs will be what you are given to work through and learn some of the concepts at the beginning of your preparation. The Practice Range will be activated when you activate your exam. It gives you a glimpse into what your actual exam range will look like, though not exactly the same, but many of the challenges you will face in the Practice Range will be on your exam. So, take LOTS of notes on how you scan, gain access, escalate privileges, gain root, and pivot.
A caveat on the Practice Range is that you will NOT be the only person using it. You will see bugs, issues, and down machines. Someone may reboot a machine while you’re actively exploiting it. It can be quite annoying and frustrating to be almost to root of a machine and it stop responding because someone else reset it. That’s, unfortunately, how it is with the Practice Range. However, I strongly advise that you take the time to go through each of the networks there and answer all the questions that you can and then document, document, document!
For ease, I’ve created a bulleted list of helpful information:
- Take extensive notes of all labs, tools, and techniques
- Work through all the labs provided by EC-Council
- Practice against relevant machines on TryHackMe, HackTheBox, or VulnHub that align with the practice lab technologies
- Be persistent! If you get frustrated with something, move on and come back to it with a fresh perspective
Time to take the exam
You’ve got a full set of notes, you’ve got a handle on all the tooling, techniques, and you’re ready to go. What next? Well, now it’s time to activate your exam within the dashboard. Once activated, you’ll have access to the practice range and can go schedule your exam. You’ll need to create a new account on the proctor’s website and schedule with them. This is where I faced another set of frustrations. The proctors, from what I can tell, are all located in India and only have time slots that start in the morning their time. This meant that I could only schedule my exam to start from anywhere from midnight to 2 am or so. I’m not a night owl anymore, so this was pretty frustrating to schedule a 12-hour session at that time. However, it was the only choice, so I did it. You can schedule two 12-hour sessions or one 24-hour session. I opted for the two 12-hour sessions as it would be easier on me. You can also ONLY schedule one session at a time. This means you schedule your first 12-hour session, then once that is complete you can schedule your second session.
Connecting to the proctor was easy, through Go-To Metting application. I was quickly on the call with them, shared my screen, went through the rules etc.., and the proctor took control of my PC to unlock the exam and get me started. From there, it was off to the races. The proctor was pretty relaxed, I’d just let them know that I needed to step away to grab a drink or use the bathroom when needed. You do have to be on camera, and you do have to have your microphone unmuted throughout the exam. So, find a good quiet area that you’ll not be disturbed while you’re taking this.
Taking the exam is much like the practice range. You’ll have different networks to hack into and questions for each that you will want to answer. I highly advise saving your answers anytime you answer a question. Just in case any technical issues arise, your answers will be saved.
Submitting your exam & the pentest report
After you have answered all the questions and you are ready to end your exam, you will let your proctor know that you are ready to end the exam. They’ll guide you through this process. Once you have submitted your test, you will get your grade immediately at the end. However, this isn’t the end. You still have 7 days, if I’m not mistaken, to complete and turn in your penetration test report.
Within your exam dashboard you’ll have a provided template that you can download and use to submit your report. I actually started on my report between my first and second exam sessions. Once my second exam session was done, I finished up my report, honed it, and turned it in a couple days later. It does take them about a week to review that report before you know if you’re certified or not.
If you follow the template, you should be good. They’re not looking for a perfect report, but definitely make sure you take screenshots of everything you do throughout the exam. As an example, screenshot your scan report, then screenshot any brute forcing that you do and passwords/accounts you get. Screenshot initial access, screenshot any privilege escalation tools/techniques you use. Such as running Linpeas and finding an exploit to get root. Then screenshot the flags and answers to questions that you are asked on the exam. For example, if it asks you the Netbios name of a PC, screenshot it for your report. This is a must; you have to prove how you got the answers to the questions on the exam.
Thoughts
Overall, I actually enjoyed the challenge of the CPENT exam. I have, up until the CPENT, only taken multiple choice exams on penetration testing. Such as the GPEN and GWAPT. I knew the tools, techniques, and the methodology behind it all. However, proving that I have the skills was a different story. I felt great after seeing my score at the end. It really gave me a confidence boost that I do know how to do these things and that I can focus and apply myself when things get hard and find the answer.
Patience and persistence are important for an exam like this. There were many times when I got very frustrated that I wasn’t getting into a box in the practice range. Then I’d take a break and come back, and the answer would finally come to me. This exam really helped solidify my knowledge and gave me the drive to go further. It isn’t an easy exam at all, and the OSCP saying of “try harder” came to mind when preparing for this exam.
I believe this is a great hands-on exam that will challenge you. However, I don’t think it’s too hard. There are parts that can get difficult but if you apply yourself, work through the pentesting process, and take your preparation seriously, you can definitely pass it first try. Best of luck to you!
